Trong lap trinh Android, bạn có thể định nghĩa cho riêng mình các Custom Font cho các chuỗi trong ứng dụng. Bạn chỉ cần tải Font bạn muốn từ Internet, và sau đó đặt trong folder là assets/fonts.
Sau khi đặt Font trong assets folder dưới fonts folder, bạn có thể truy cập nó trong Java code thông qua lớp Typeface. Đầu tiên, lấy tham chiếu của Text View trong code. Cú pháp là: −
TextView tx = (TextView)findViewById(R.id.textview1);
Điều tiếp theo bạn cần làm là gọi phương thức static của lớp Typeface làcreateFromAsset() để lấy Custom Font đó từ assets folder. Cú pháp như sau: −
Typeface custom_font = Typeface.createFromAsset(getAssets(), "fonts/font name.ttf");
Cuối cùng, bạn thiết lâp đối tượng Custom Font tới thuộc tính TextView Typeface của mình. Bạn cần gọi phương thức setTypeface() để thực hiện điều đó. Cú pháp như sau: −
tx.setTypeface(custom_font);
Ngoài các phương thức trên, lớp Typeface cũng định nghĩa một số phương thức khác để bạn có thể xử lý Font hiệu quả hơn.
SttPhương thức & Miêu tả
1 create(String familyName, int style)
Tạo một đối tượng Typeface với một familyname đã cho và thông tin về style
2 create(Typeface family, int style)
Tạo một đối tượng Typeface mà kết nối nhất với Typeface đang tồn tại và Style đã xác định
3 createFromFile(String path)
Tạo một đối tượng mới từ fonts file đã cho
4 defaultFromStyle(int style)
Trả về một trong các đối tượng Typeface mặc định, dựa trên style đã cho
5 getStyle()
Trả về thuộc tính style nội tại của đối tượng Typeface
Ví dụ
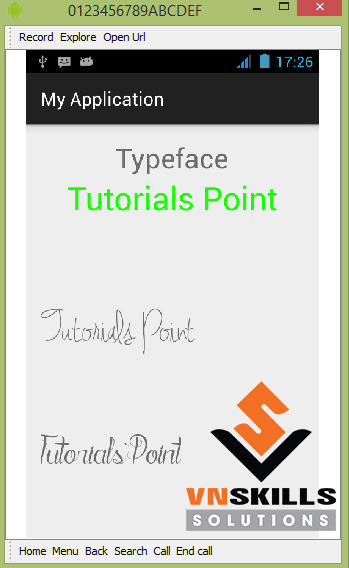
Ví dụ sau minh họa sự sử dụng Typeface để xử lý Custom Font. Nó tạo một ứng dụng đơn giản mà hiển thị một Custom Font mà bạn đã xác định trong fonts file.
Để thực nghiệm ví dụ, bạn cần chạy trên một thiết bị thực sự hoặc một Emulator.
Sau đây là nội dung của Main Activity file đã được sửa đổi: MainActivity.java.
package com.example.sairamkrishna.myapplication;

import android.content.Context;
import android.content.Intent;
import android.content.SharedPreferences;

import android.graphics.Typeface;
import android.support.v7.app.ActionBarActivity;
import android.os.Bundle;

import android.view.Menu;
import android.view.MenuItem;
import android.view.View;

import android.widget.Button;
import android.widget.EditText;
import android.widget.TextView;
import android.widget.Toast;

public class MainActivity extends ActionBarActivity {
   TextView tv1,tv2;

   protected void onCreate(Bundle savedInstanceState) {
      super.onCreate(savedInstanceState);
      setContentView(R.layout.activity_main);

      tv1=(TextView)findViewById(R.id.textView3);
      tv2=(TextView)findViewById(R.id.textView4);

      Typeface face= Typeface.createFromAsset(getAssets(), "font/font.ttf");
      tv1.setTypeface(face);

      Typeface face1= Typeface.createFromAsset(getAssets(), "font/font1.ttf");
      tv2.setTypeface(face1);
   }

   @Override
   public boolean onCreateOptionsMenu(Menu menu) {
      // Inflate the menu; this adds items to the action bar if it is present.
      getMenuInflater().inflate(R.menu.menu_main, menu);
      return true;
   }

   @Override
   public boolean onOptionsItemSelected(MenuItem item) {
      // Handle action bar item clicks here. The action bar will
      // automatically handle clicks on the Home/Up button, so long
      // as you specify a parent activity in AndroidManifest.xml.

      int id = item.getItemId();

      //noinspection SimplifiableIfStatement
      if (id == R.id.action_settings) {
         return true;
      }
      return super.onOptionsItemSelected(item);
   }
}
Bạn sửa đổi nội dung của activity_main.xml.
<RelativeLayout xmlns:android="http://schemas.android.com/apk/res/android"
   xmlns:tools="http://schemas.android.com/tools" android:layout_width="match_parent"
   android:layout_height="match_parent" android:paddingLeft="@dimen/activity_horizontal_margin"
   android:paddingRight="@dimen/activity_horizontal_margin"
   android:paddingTop="@dimen/activity_vertical_margin"
   android:paddingBottom="@dimen/activity_vertical_margin" tools:context=".MainActivity">

   <TextView
      android:layout_width="wrap_content"
      android:layout_height="wrap_content"
      android:text="Typeface"
      android:id="@+id/textView"
      android:layout_alignParentTop="true"
      android:layout_centerHorizontal="true"
      android:textSize="30dp" />

   <TextView
      android:layout_width="wrap_content"
      android:layout_height="wrap_content"
      android:text="Tutorials Point"
      android:id="@+id/textView2"
      android:layout_below="@+id/textView"
      android:layout_centerHorizontal="true"
      android:textSize="35dp"
      android:textColor="#ff16ff01" />

   <TextView
      android:layout_width="wrap_content"
      android:layout_height="wrap_content"
      android:text="Tutorials Point"
      android:id="@+id/textView3"
      android:layout_centerVertical="true"
      android:textSize="45dp"
      android:layout_alignParentRight="true"
      android:layout_alignParentEnd="true"
      android:layout_alignParentLeft="true"
      android:layout_alignParentStart="true" />

   <TextView
      android:layout_width="wrap_content"
      android:layout_height="wrap_content"
      android:text="Tutorials Point"
      android:id="@+id/textView4"
      android:layout_below="@+id/textView3"
      android:layout_alignLeft="@+id/textView3"
      android:layout_alignStart="@+id/textView3"
      android:layout_marginTop="73dp"
      android:textSize="45dp" />

</RelativeLayout>
Và đây là nội dung của res/values/string.xml.
<resources>
   <string name="app_name">My Application</string>
   <string name="hello_world">Hello world!</string>
   <string name="action_settings">Settings</string>
</resources>
Tiếp theo là nội dung của AndroidManifest.xml file.
<?xml version="1.0" encoding="utf-8"?>
<manifest xmlns:android="http://schemas.android.com/apk/res/android"
   package="com.example.sairamkrishna.myapplication" >

   <application
      android:allowBackup="true"
      android:icon="@mipmap/ic_launcher"
      android:label="@string/app_name"
      android:theme="@style/AppTheme" >

      <activity
         android:name=".MainActivity"
         android:label="@string/app_name" >

         <intent-filter>
            <action android:name="android.intent.action.MAIN" />
            <category android:name="android.intent.category.LAUNCHER" />
         </intent-filter>

      </activity>

   </application>
</manifest>
Chạy ứng dụng Custom Font vừa sửa đổi ở trên.

Như bạn có thể thấy, text xuất hiện trên AVD không là font mặc định trong Android, thay vào đó là Custom Font mà bạn đã xác định trong fonts folder.
0 nhận xét:
Đăng nhận xét